
Run Redis Run
In my first post, I have explained a little about what is Redis, and what are the common use cases for using it. In this post, we will bake a simple cache solution using Redis.
The Recipe
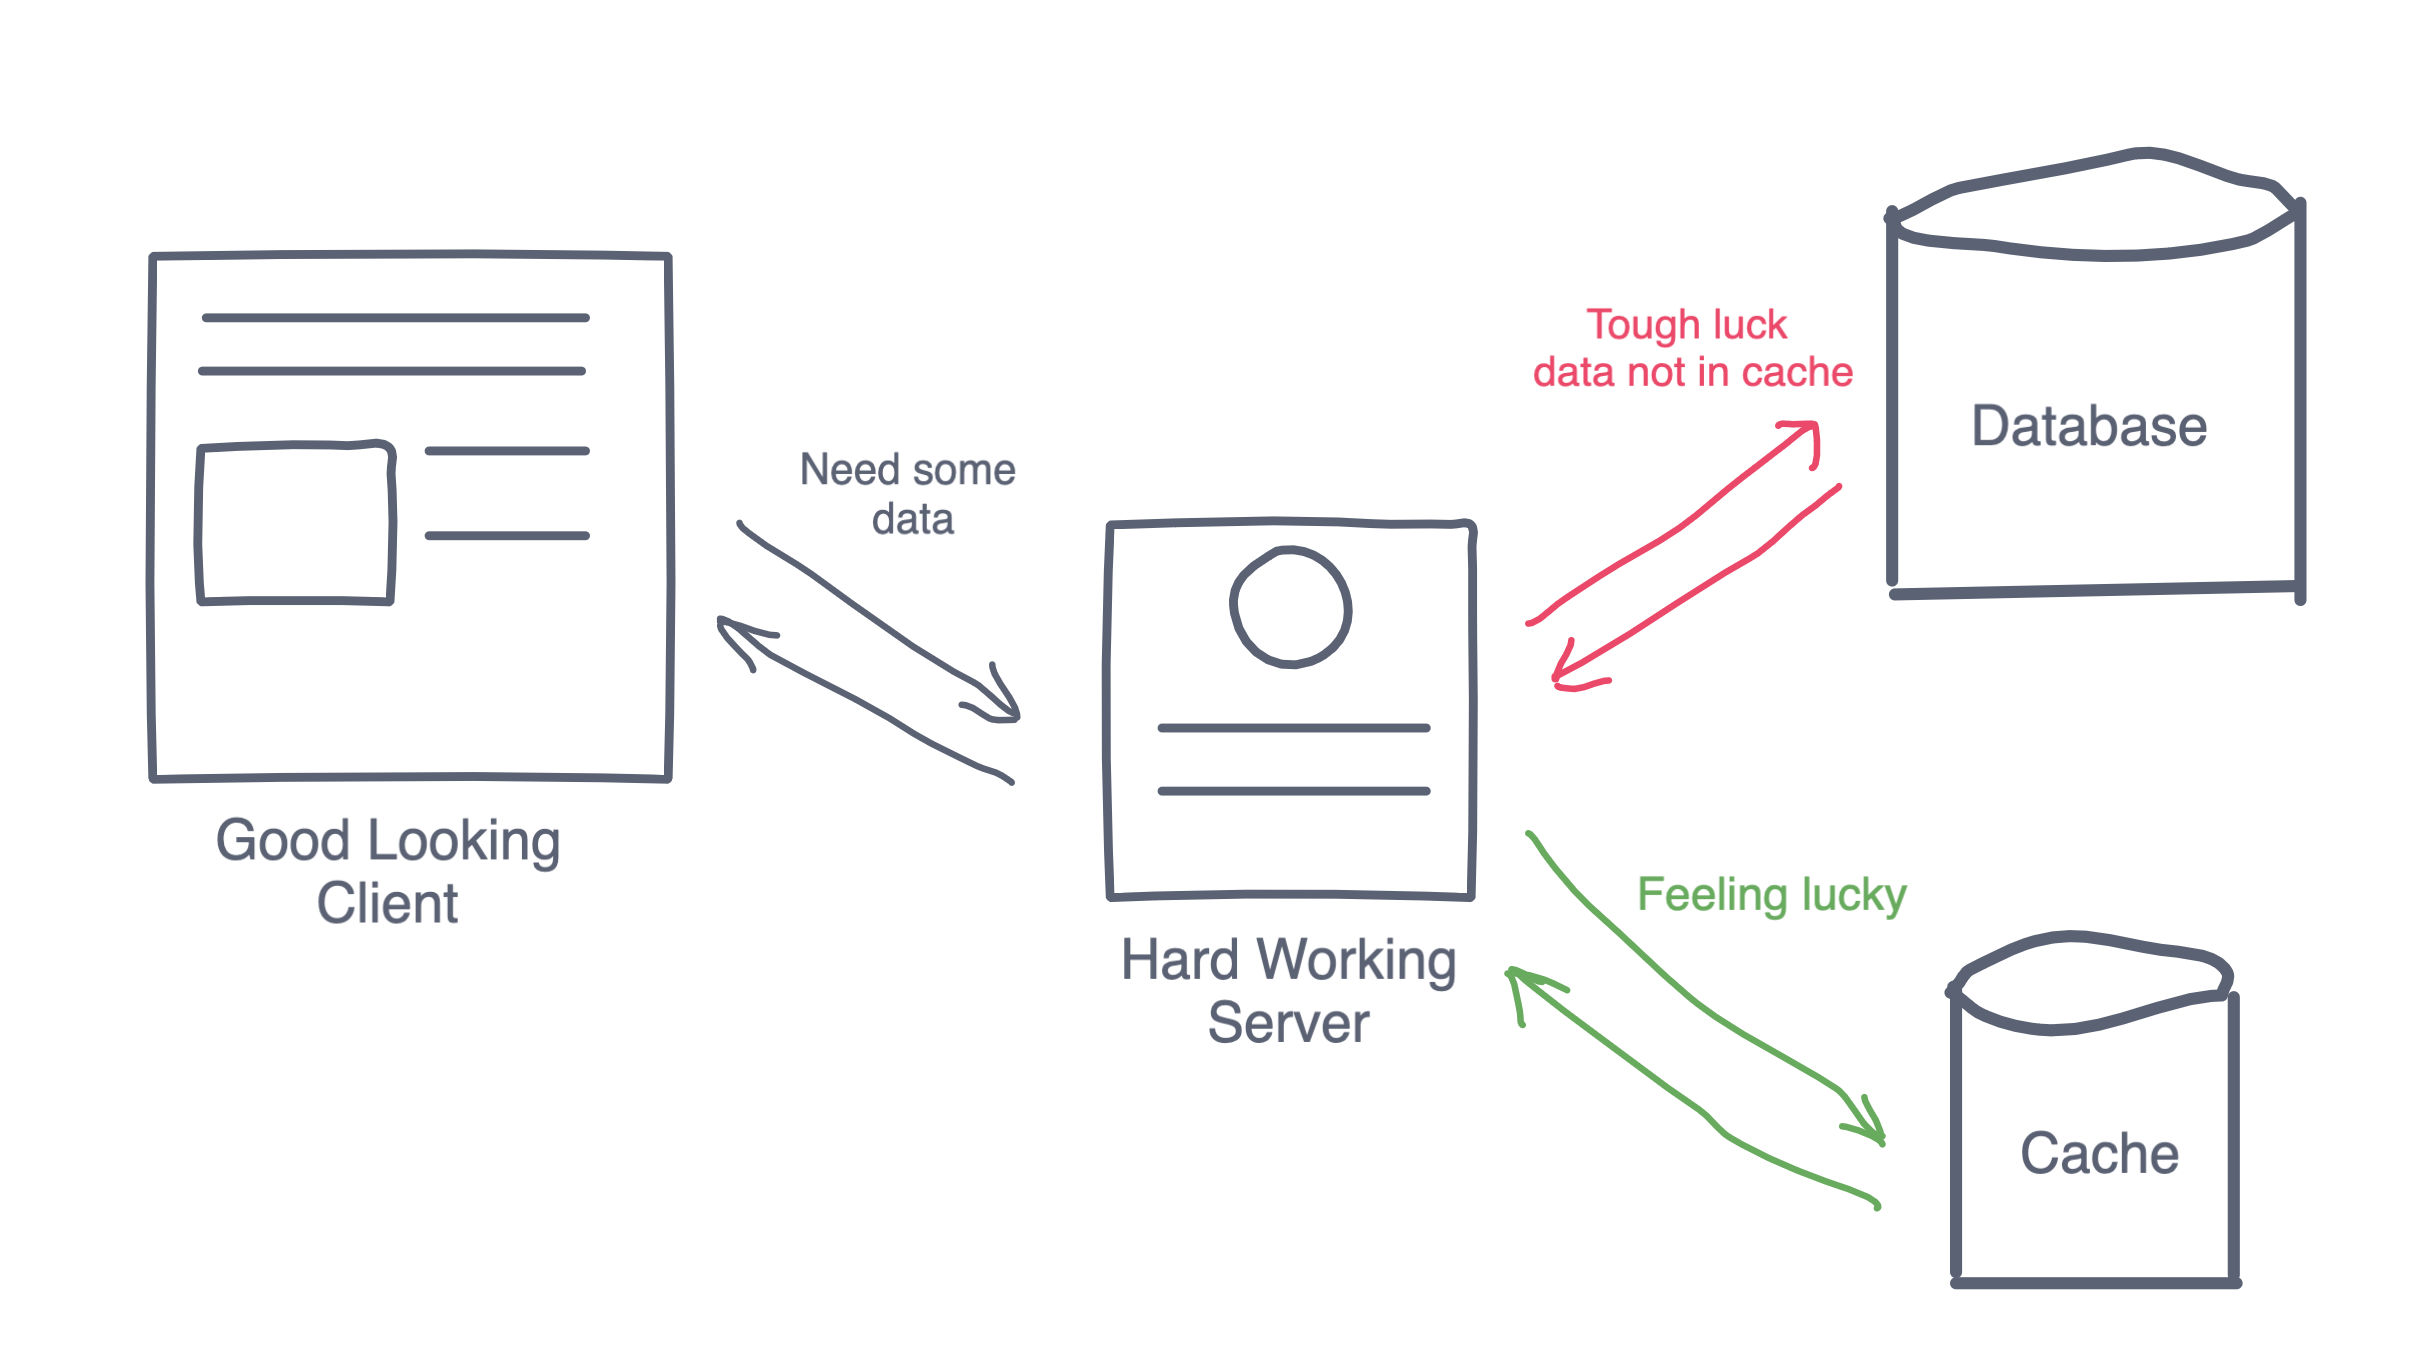
- MySQL database - in our scenario, it will play the role of the primary database.
- Redis - will take the role of our blazing fast cache
- Backend server - will handle clients requests and, fetch the data needed from Redis and MySQL in case the data is not in Redis.
- Client - display the data retrieved from the backend server.
Preparing the ingredients
To make things sweet and simple I will use Docker to help me in setting up all the ingredients.
The first Docker container will be our database, in this case, I will use MySQL. To get things running on my mac, I have done the following:
$docker run -p 3306:3306 -d --name mysql -e MYSQL_ROOT_PASSWORD=password mysql/mysql-server
To enable access to the database, outside of the container I had to the following steps:
Login into to MySQL, within the docker container, using the password in the previous step in our case it was password.
$docker exec -it mysql bash
bash-4.2# mysql -uroot -ppassword
Next we need to create a user and grant him privileges. (use % instead of localhost)
mysql> CREATE USER 'geek'@'%' IDENTIFIED WITH mysql_native_password BY 'password';
Query OK, 0 rows affected (0.00 sec)

mysql> GRANT ALL PRIVILEGES on * . * to 'geek'@'%';
Query OK, 0 rows affected (0.00 sec)
Then finally we can access MySQL from outside the container and load some data to it using this repo. We can also now connect with Workbench to our newly created database.
In order to spin up a Redis container on localhost, just run:
$docker run --name myredis -p 6379:6379 -d redis redis-server --requirepass password
You can find some more info here about running Redis as a docker container.
Hard Working Server
Now that we have our database all set and ready with some data we can query, let’s bake the server.
Create the server working folder and initialize our node backend project
$mkdir QueryCacheServer
$npm -init -y
We will use Express framework, and install Redis and MySQL clients as dependencies.
$npm install express redis mysql
Tip: if you are using npm 5, you do not need to specify -S or –save flag to save as a dependency in your package.json file.
Now for some code, this is our server.js
const
    express = require('express'),
    redis = require('redis'),
    mysql = require('mysql'),
    crypto = require('crypto'),
    app = express();

const port = 5000;
let isDBConnected = false;
let isRedisConnected = false;

// create connection to database
const dbConn = mysql.createConnection({
    host: 'localhost',
    user: 'geek',
    password: process.env.QUERY_DB_PASS, //store your credentials somewhere safe
    database: 'employees'
});


// connect to database
dbConn.connect((err) => {
    if (err) {
        console.error(err);
    } else {
        isDBConnected = true;
        console.log('Connected to database');
    }
});

// create and connect redis client to local instance.
const redisClient = redis.createClient({password: process.env.QUERY_REDIS_PASS}); //store your credentials somewhere safe

// Print redis errors to the console
redisClient.on('error', (err) => {
    isRedisConnected = false;
    console.error(err);
}).on('connect', () => {
    isRedisConnected = true;
    console.log('Connected to Redis');
});

//Query data
function doQuery(req, res, next) {
    if(!isDBConnected || !isRedisConnected) {
        res.send("Server not connected");
    }

    //query from MySQL
    let query = `select * from employees.employees e where last_name like '%${req.query.name}%'`;
    let key = crypto.createHash('sha1')
        .update(query)
        .digest('hex');

    // check if the
    redisClient.exists(key, (err, isExist) => {
        if (isExist === 1) {
            console.log('Feeling lucky, key found in Redis');

            //measure time against Redis
            console.time('CacheQuery');
            redisClient.get(key, function (err, reply) {
                //end measure time of query against MySQL
                console.timeEnd('CacheQuery');

                if(err) {
                    next(err);
                } else {
                    res.send(reply);
                }
            });
        } else if (err) {
            next(err);
        } else {
            console.log('No luck, get the data from DB');
            //measure time against MySQL
            console.time('DBQuery');
            dbConn.query(query, (err, result) => {
                //end measure time of query against MySQL
                console.timeEnd('DBQuery');
                if (err) {
                    next(err);
                } else {
                    const data = JSON.stringify(result);
                    redisClient.set(key, data, function (err, reply) {
                        if(err) {
                            next(err);
                        } else {
                            redis.print
                        }
                    });

                    res.send(data);
                }
            });
        }
    });
};

app.set('port', process.env.port || port); // set express to use this port

// configure middleware
app.use(function (req, res, next) {
    res.header("Access-Control-Allow-Origin", "*");
    res.header("Access-Control-Allow-Headers", "Origin, X-Requested-With, Content-Type, Accept");
    next();
});

app.get('/query', doQuery);

app.listen(port, () => {
    console.log(`Server running on port: ${port}`);
});
For those who have paid attention can easily see that we can test our server with our browser at localhost:5000/query.
To run the query we also need to pass a query parameter for the name to search. If you will try and test the server then we will see that in the first time it will, of course, load the data from the DB and on the second try it will get it from Redis.
If you will give at try (I have tried this http://localhost:5000/query?name=tyk), you should see something similar to the following
Connected to redis
Server running on port: 5000
Connected to database
No luck, get the data from DB
DBQuery: 187.621ms
Feeling lucky, key found in Redis
CacheQuery: 1.213ms
Quite impressive don’t you think 😃 we have boosted things up
You can check out the repo here
The Client
Now it is time to create our good looking client, for that we will use React. To get started quickly with React just run:
$npx create-react-app querycacheclient
In my App.js I will just add a single component which we will soon implement, this is our App.js:
import React, { Component } from 'react';
import EmpList from './EmpList'
import './App.css';

class App extends Component {
  render() {
    return (
      <div className="App">
        <EmpList/>
      </div>
    );
  }
}

export default App;
Next up is EmpList.js, the code is also relatively simple as well. The render method is built in two parts:
The header which includes our search input, and a search button. The second part renders the employees list, and each item in the list will consist of the full name of the employee.
import React, { Component } from 'react';

class EmpList extends Component {

    constructor() {
        super()
        this.state = {
            employees: [],
        }
    }

    handleInput = e => {
        this.searchPattern = e.target.value;
    }

    queryEmps = () => {
        console.time('DBQuery');
        // Fetch the data from our hard working server
        fetch(`http://localhost:5000/query?name=${this.searchPattern}`)
            .then(result => {
                console.timeEnd('DBQuery');
                return result.json();
            }).then(data => {
                // foreach row render the name of the employee
                let empData = data.map((empRec) => {
                    return (
                        <li key={empRec.emp_no}>{`${empRec.first_name} ${empRec.last_name}`}</li>
                    );
                });
                this.setState({ employees: empData });
            });
    }

    render() {
        return (
            <div className="EmpList">
                <div className="header">
                    <input>
                        placeholder="Search"
                        onChange={this.handleInput}
                        value={this.state.searchPattern}
                    />
                    <button onClick={this.queryEmps} Search </button>
                </div>
                <ul className="theList">{this.state.employees}</ul>
            </div>
        )
    }
}

export default EmpList
You can check out the repo here Now we can finally test all the pieces together.

I leave it to you guys to see the results of queries that are cached compared to ones that are not.
Hope you liked this recipe, will be back as soon as I have a new recipe ready.